
February 16, 2017 ( last updated : February 21, 2017 )
jboss-fuse
fis
openshift
build-time
paas
docker
https://github.com/alainpham/fis20-simple-svc
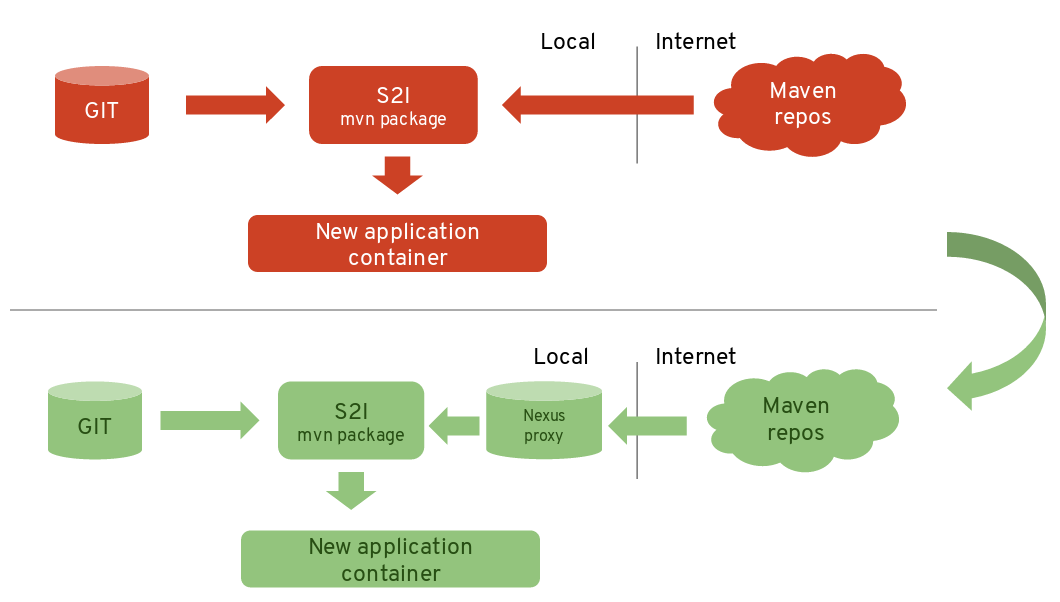
Openshift offers a whole pipeline to create container images directly from source code. It is usable for general purpose Java applications as well as for Fuse Integration Service projects. This post will present how to accelerate the build time of those images by setting up a local Nexus Repository and configuring application templates to use this repository for the build process. The idea is not having to download from the Internet all the FIS maven dependencies when building a new project. At the time of writing FIS 2.0 is available as tech preview.
(update 22/02/2017) February 21, 2017 : FIS 2.0 GA has been released.
The method shown here doesn't use the MVN_MIRROR_URL parameter which was enabled in FIS 2.0. This will work on FIS 2.0 and also FIS 1.0.
The reason why build times can be long with the source S2I pipeline is because each new application build requires to spin up a S2I container to launch the maven goals in order to package your application. Building the same application template after the first time is faster because the downloaded artifacts are reused. But every time we create a new application, it will go through the same initial downloading process again. That is why instead of having the S2I container download everything from Internet repositories each time, we can setup a Nexus server that will proxy these repositories and store already downloaded artifacts locally. Here we will show how to setup a local standalone Nexus2 repository
Download the Nexus Repository Manager OSS 2.x package on : https://www.sonatype.com/download-oss-sonatype
Unzip it and run it :
./nexus console
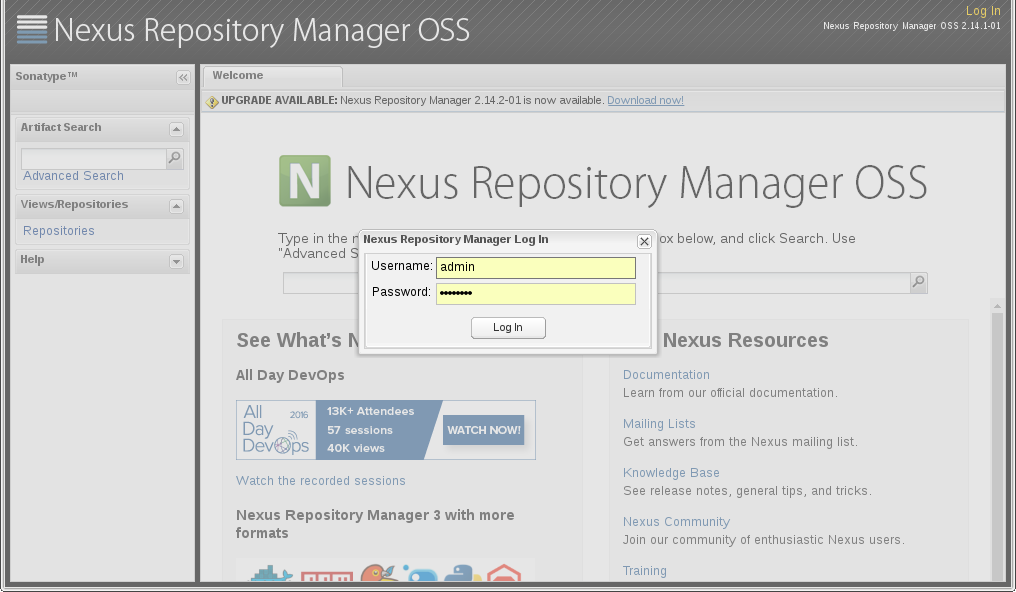
Connect to the user interface with the user and password admin/admin123
http://localhost:8081/nexus
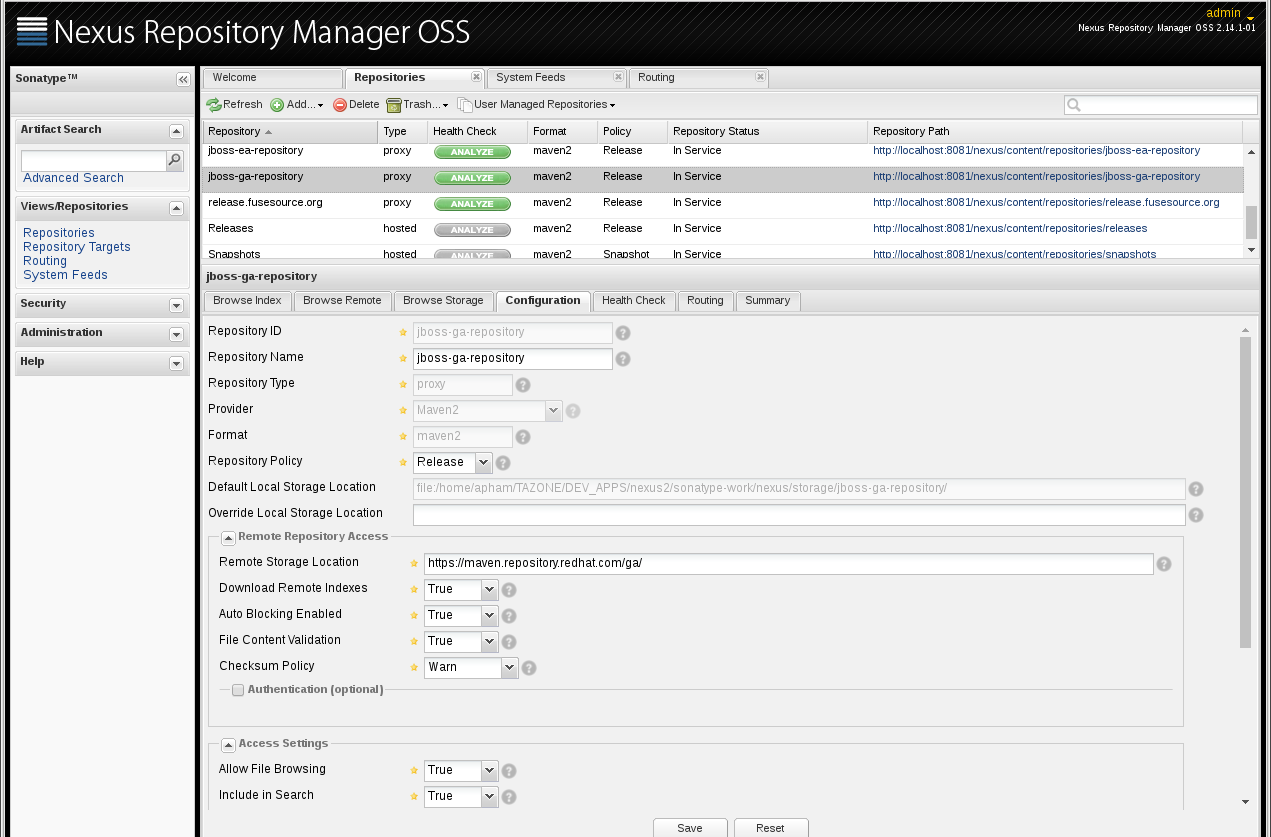
Click on Repositories and add 3 new proxy repositories
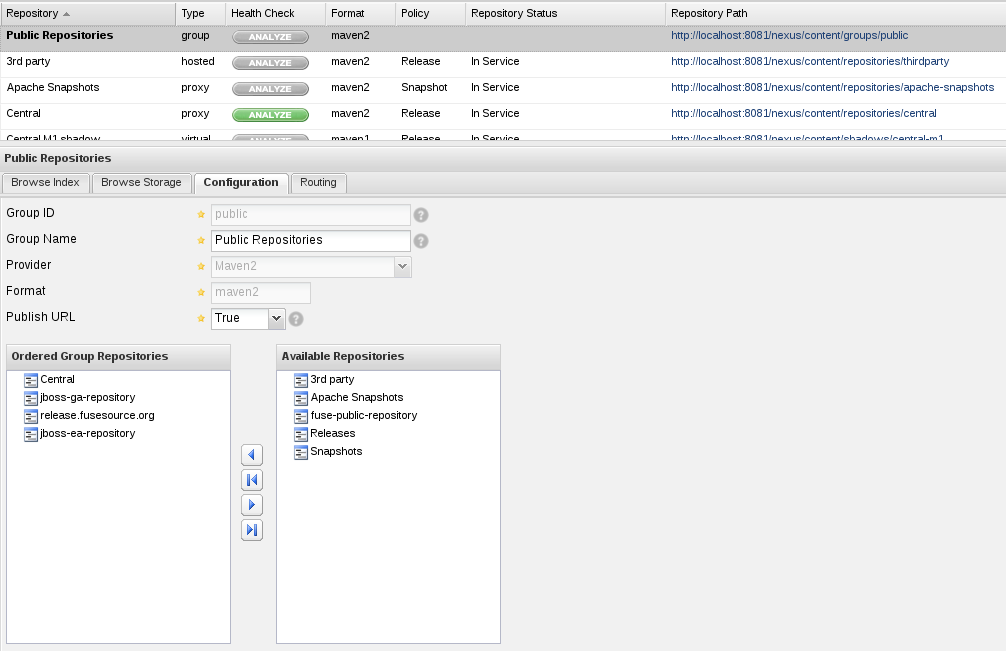
Select the public group, add all the created proxy repositories and maven central.
That's it, you have successfully setup your local Maven repository that will keep a local copy of all downloaded artifacts.
Now in order to test a deployment let's create a Fuse project. Before we begin make sure that you have these prerequisites on your developer machine :
Make sure to configure your maven settings.xml file and add the Red Hat GA and Early access repositories to it.
<profile>
  <id>rh-repos</id>
<repositories>
	<!-- EARLY ACCESS RH-->
	<repository>
      <id>jboss-ea-repository</id>
      <url>https://maven.repository.redhat.com/earlyaccess/all</url>
      <releases>
        <enabled>true</enabled>
        <updatePolicy>never</updatePolicy>
      </releases>
      <snapshots>
        <enabled>false</enabled>
      </snapshots>
    </repository>

	<!-- Global Availability RH-->
      <repository>
      <id>jboss-ga-repository</id>
      <url>https://maven.repository.redhat.com/ga/</url>
      <releases>
        <enabled>true</enabled>
        <updatePolicy>never</updatePolicy>
      </releases>
      <snapshots>
        <enabled>false</enabled>
      </snapshots>
    </repository>

    <!-- Fuse Source GA-->
    <repository>
      <id>fuse-source</id>
      <releases>
        <enabled>true</enabled>
        <updatePolicy>never</updatePolicy>
      </releases>
      <snapshots>
        <enabled>false</enabled>
      </snapshots>
      <name>FuseSource Release Repository</name>
      <url>http://repo.fusesource.com/nexus/content/repositories/releases</url>
    </repository>
  </repositories>


  <pluginRepositories>
	<!-- EARLY ACCESS RH-->
	<pluginRepository>
      <id>jboss-ea-plugin-repository</id>
      <url>https://maven.repository.redhat.com/earlyaccess/all</url>
      <releases>
        <enabled>true</enabled>
        <updatePolicy>never</updatePolicy>
      </releases>
      <snapshots>
        <enabled>false</enabled>
      </snapshots>
    </pluginRepository>

	<!-- Global Availability RH-->
    <pluginRepository>
       <id>jboss-ga-plugin-repository</id>
      <url>https://maven.repository.redhat.com/ga/</url>
      <releases>
        <enabled>true</enabled>
        <updatePolicy>never</updatePolicy>
      </releases>
      <snapshots>
        <enabled>false</enabled>
      </snapshots>
    </pluginRepository>

    <!-- Fuse Source GA-->
    <pluginRepository>
      <id>fusesource-plugin</id>
      <releases>
        <enabled>true</enabled>
        <updatePolicy>never</updatePolicy>
      </releases>
      <snapshots>
        <enabled>false</enabled>
      </snapshots>
      <name>FuseSource Release Repository</name>
      <url>http://repo.fusesource.com/nexus/content/repositories/releases</url>
    </pluginRepository>
  </pluginRepositories>

</profile>
</profiles>


<activeProfiles>
 <activeProfile>rh-repos</activeProfile>
</activeProfiles>mvn archetype:generate \ -DarchetypeCatalog=https://maven.repository.redhat.com/ga/io/fabric8/archetypes/archetypes-catalog/2.2.195.redhat-000004/archetypes-catalog-2.2.195.redhat-000004-archetype-catalog.xml \ -DarchetypeGroupId=org.jboss.fuse.fis.archetypes \ -DarchetypeArtifactId=spring-boot-camel-xml-archetype \ -DarchetypeVersion=2.2.195.redhat-000004
Add these dependencies to the pom.xml file in order to create a JSON Rest Webservice.
<dependency>
	<groupId>org.apache.camel</groupId>
	<artifactId>camel-jetty</artifactId>
</dependency>
<dependency>
	<groupId>org.apache.camel</groupId>
	<artifactId>camel-jackson</artifactId>
</dependency>Open the camel-context.xml file to create the following RestConfigurations and routes.
<camelContext xmlns="http://camel.apache.org/schema/spring">
	<restConfiguration bindingMode="json" component="jetty" enableCORS="true"
		host="0.0.0.0" port="8666" />
	<rest id="svc" path="/">
		<get id="testOp" uri="test">
			<to uri="direct:test" />
		</get>
	</rest>
	<route id="testRoute">
		<from id="testStarter" uri="direct:test" />
		<log message="received request" />
		<setBody>
			<constant>Hello world</constant>
		</setBody>
	</route>
</camelContext>
To avoid a tcp port conflict with the default Nexus port (8081), make sure to change the parameter "management.port" in the resources/application.properties file. You can change it to 8086 for example.
Run the project locally to see if everything is fine. Go to the root folder of your project.
mvn spring-boot:run
Call the service using a browser/
http://localhost:8666/test
At the root of your project copy your current maven settings.xml file (the one with all the repositories defined) and add a mirror bloc as follows. This will be used later by Openshift S2I. It there to configure Maven to get artifacts from your local Nexus repository.
 <mirrors>
   <mirror>
     <id>internal-repository</id>
     <name>Maven Repository Manager running on repo.mycompany.com</name>
     <url>${MVN_MIRROR}</url>
     <mirrorOf>*</mirrorOf>
   </mirror>
</mirrors>Connect to your Openshift instance using the "oc" command
oc login -u developer
wget raw.githubusercontent.com/jboss-fuse/application-templates/application-templates-2.0.redhat-000026/fis-image-streams.json
oc create -f fis-image-streams.json
This is a very crucial step. Here we will tweak the application template json/yml file so that the S2I takes into account the Nexus repository for the Maven build.
Get the template json file for FIS Spring-Boot applications. Optionally you can convert the json to a yml file which I find easier to read.
wget https://raw.githubusercontent.com/jboss-fuse/application-templates/application-templates-2.0.redhat-000026/quickstarts/springboot-camel-template.json
The important parameters to change in the template are the following.
- name: APP_NAME
  displayName: Application Name
  required: true
  value: springboot-rest
  description: The name assigned to the application.
- name: GIT_REPO
  displayName: Git Repository URL
  required: true
  value: https://github.com/alainpham/fis20-simple-svc.git
  description: The URL of the repository with your application source code.
- name: GIT_REF
  displayName: Git Reference
  value: master
  description: Set this to a branch name, tag or other ref of your repository if you
    are not using the default branch.
- name: APP_VERSION
  displayName: Application Version
  value: 0.0.1
- name: IMAGE_STREAM_NAMESPACE
  displayName: Image Stream Namespace
  value: ''
  required: false
The most important change is the following MAVEN_ARGS parameter. It is where we point to the Nexus repo we created and where we use the settings.xml file at to root of the project. Note that the IP address here 172.17.0.1 is the one that belongs to the host machine bound to the docker network interface. Adapt it to your situation if necessary.
- name: MAVEN_ARGS
  displayName: Maven Arguments
  value: package -DMVN_MIRROR=http://172.17.0.1:8081/nexus/content/groups/public/ -gs settings.xml -DskipTests -Dfabric8.skip -e -B
You should also add the following parameter to tweak the heap size of the JVM used for the maven build. In some rare cases you could run into an out of heap space exception. It is always good to keep control over this parameter.
- name: MAVEN_OPTS
  description: maven options such as heapspace
  value: "-Xmx1024m"
Add the environment parameter MAVEN_OPTS in the sourceStrategy bloc of the buildConfig so it is taken into account in the Maven command
sourceStrategy:
  from:
    kind: ImageStreamTag
    namespace: "${IMAGE_STREAM_NAMESPACE}"
    name: fis-java-openshift:${BUILDER_VERSION}
  forcePull: true
  incremental: true
  env:
  - name: BUILD_LOGLEVEL
    value: '5'
  - name: ARTIFACT_DIR
    value: "${ARTIFACT_DIR}"
  - name: MAVEN_ARGS
    value: "${MAVEN_ARGS}"
  - name: MAVEN_ARGS_APPEND
    value: "${MAVEN_ARGS_APPEND}"
  - name: MAVEN_OPTS
    value: ${MAVEN_OPTS}
We should also add the service and routes to expose the Rest service to the external world
- apiVersion: v1
  kind: Service
  metadata:
    name: "${APP_NAME}"
    creationTimestamp:
    labels:
      component: "${APP_NAME}"
      group: quickstarts
      project: "${APP_NAME}"
      provider: s2i
      version: "${APP_VERSION}"
  spec:
    ports:
    - name: rest-svc-tcp
      port: 8666
      protocol: TCP
      targetPort: 8666
    selector:
      component: "${APP_NAME}"
      deploymentconfig: "${APP_NAME}"
      group: quickstarts
      project: "${APP_NAME}"
      provider: s2i
      version: "${APP_VERSION}"
    sessionAffinity: None
    type: ClusterIP
  status:
    loadBalancer: {}

- apiVersion: v1
  kind: Route
  metadata:
    name: "${APP_NAME}"
    creationTimestamp:
    labels:
      component: "${APP_NAME}"
      group: quickstarts
      project: "${APP_NAME}"
      provider: s2i
      version: "${APP_VERSION}"
  spec:
    to:
      kind: Service
      name: "${APP_NAME}"
    port:
      targetPort: rest-svc-tcp
  status: {}
This is the final file I have used :
wget https://raw.githubusercontent.com/alainpham/fis20-simple-svc/v1.0/openshift/solution.yml
The working project with all the resources can be found here :
https://github.com/alainpham/fis20-simple-svcYou can use the command line. Alternatively you can use the Openshift UI to import the application template and deploy it.
oc create -f solution.yml
oc create oc new-app springboot-rest

Test your service at the following url
http://springboot-rest-myproject.[yourIP].xip.io/test
Note that the build takes only about 2 minute the second time you run it instead of 20 minutes (in my case with a not so fast internet connection). This is thanks to the fact that the maven dependencies are taken from the local Nexus instead of being downloaded from the Internet.
Other resources :Originally published February 16, 2017
Latest update February 21, 2017
Related posts :